


Connect Boarding Application (CBA) is an internal tool designed to assist dealerships and service partners in setting up Škoda Connect services for their customers. CBA is a solution aimed at helping both Sales and After Sales processes. Whether dealing with a new customer who has just ordered a Škoda vehicle or a returning customer for regular service, CBA can be used to enroll their vehicle in the Škoda Digital Ecosystem. The application enables dealers and service advisors to initiate whole enrollment process - and the CBA then guides the customers to create Škoda Connect account, download the MyŠkoda app, and finish the enrollment. CBA sets selected preferred service partner and enables service scheduling automatically.
Overview of CBA
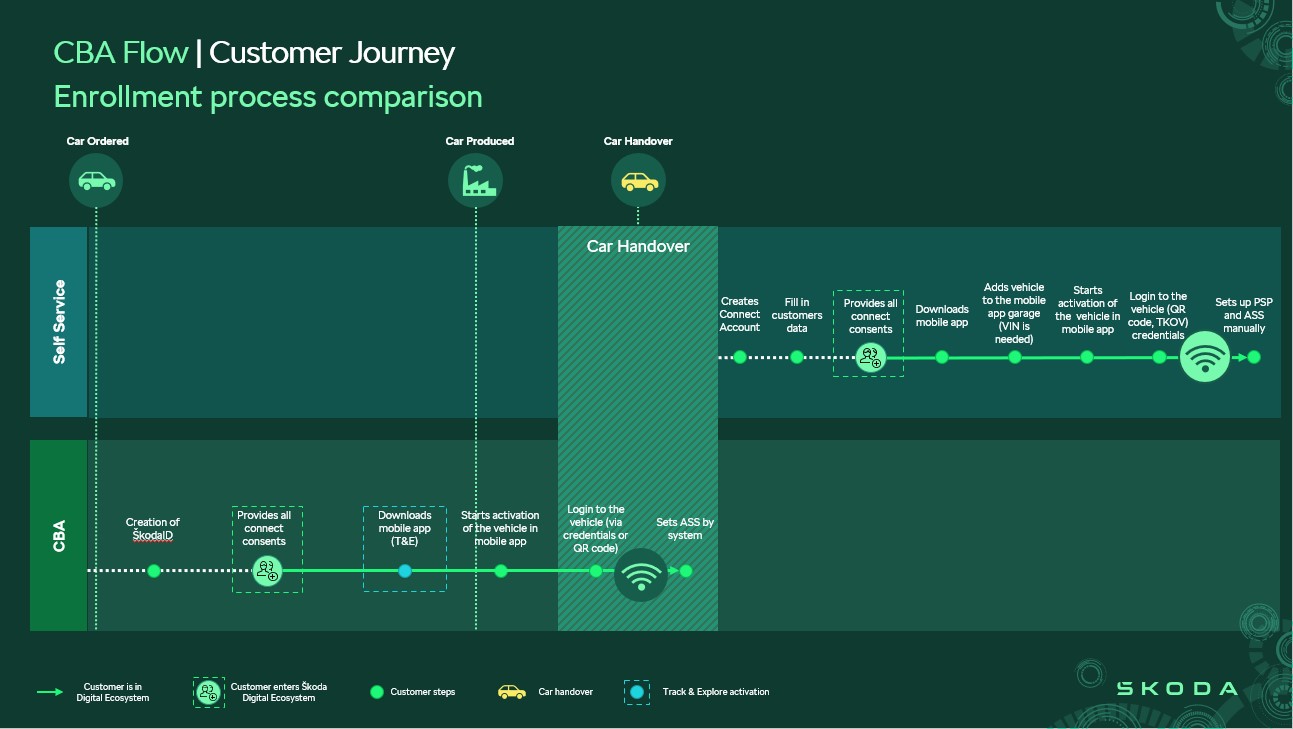
Throughout the activities included in the registration process, you can count with assistance of the Connect Boarding Application (CBA). Dealers play an active role in the activation of Škoda Connect services by guiding the customer through the entire process from Škoda ID creation to succesfull vehicle enrolment.
Key Users: Sales and After Sales partners
Vehicle Compatibility: MOD1, MOD2, MOD3, and MOD4 - Škoda Connect capable vehicles
Availability: Live in all Škoda Connect markets since April 2021
Exclusions: Not applicable to vehicles with SmartLink services
Use Cases: New cars in production, stock, used, and in-use cars
Fleet Enrollment: Predelivery enrollment can be initiated for multiple vehicles (CBA supports B2C connectivity only)

Detailed 3rd Party Enrollment process
Let’s take a closer look at the steps involved in the CBA process:
1. Car configuration and ordering
The process for ordering a car and Škoda Connect services remains unchanged. The customer can utilize the Car Configurator to configure the car and get in touch with a dealer. The definitive car order is always made at the dealership. Škoda Connect services, which are covered by a separate contract from the car purchase agreement, are also set up when the order is placed.
2. Initiation of enrollment process
When a car is ordered at your dealership, you initiate the whole enrolment process via creating a record in CBA (for detailed steps, see other chapters of User Manual).
When creating a customer profile in the CBA:
|

3. Automatic VIN
For the production cars, when the car is produced and VIN is known, the VIN number is automatically filled in to CBA based on the Commission Number. The system guides then the customer to perform the steps to be done before car handover.
(In case the OrderNo is entered to CBA, a dealer has to fill in Commission Number when it is known so the CBA process can continue.)
4. Customer registration
On the basis of the VIN, the customer is prompted by automatic email or subsequent reminders to take further steps to be able to finish the enrolment during the car handover. The customer will be emailed the instructions necessary for successful registration and completion of the entire process, namely:
• register and create a Škoda Connect Account
• download and open the MyŠkoda mobile application, log in with your Škoda credentials and start activation of your new vehicle
Note: The generation of automatic emails depends on whether the customer has already Škoda ID/Škoda Connect account, does already use the MyŠkoda app, or is an entirely new customer without any Škoda ID. On top, emails depend if the market does use Track & Explore feature or not. The emails may therefore vary from one customer to another, or based on the market.
5. Activation of Škoda Connect services and car handover
The final step in the process is to finish the activation of Škoda Connect services, which customers can do manually directly in the car when they take delivery of it.
For all vehicles, including in-stock and used vehicles, the infotainment system must be paired manually with the user's account. In such case, you enroll the vehicle together with the customer during the car handover by log in to the vehicle - a pairing code, credentials or a QR code (TKOV is no longer needed, if vehicle is enrolled via the CBA). Please support the customer to complete the activation of Škoda Connect services in the vehicle by following these steps:
1. Open My Škoda application
2. Go to Garage
3. Start vehicle activation in the mobile app by clicking the “Activate” or "Finish Activation" button
4. The screen to verify yourself as the primary user in the vehicle will appear
5. In the vehicle - open the menu and go to the "Users”, select button “+” to add primary user
6. Wait until the method displayed and enter the pairing code, credentials or scan QR code with your mobile phone.
Activation Methods:
Pairing Code:
The in-car procedure is very simple. In the infotainment system, users open Settings in the Menu, select Škoda Connect (online services), click on Register and enter the pairing code, if this method is offered. All done!
QR code or Credentials:
In the Enyaq, services are activated exclusively via QR code. To a certain extent, the procedure is very similar to activation via a pairing code, as users need to set up their own Škoda ID account in the MyŠkoda app. After that, they must assign the car to that account using the VIN code and then carry out all the other steps required. At this point, the procedure varies slightly depending on what version of software is installed in the car.
- In cars equipped with MOD4.1, users need to open Settings in the infotainment system, click on Connect Škoda Connect and press Connect, following which a QR code is displayed.
- In cars equipped with MOD4.2, users do not need to click on anything, as the car automatically presents the QR code to them at the appropriate moment.
The user then scans the code using the MyŠkoda app and the process is complete.
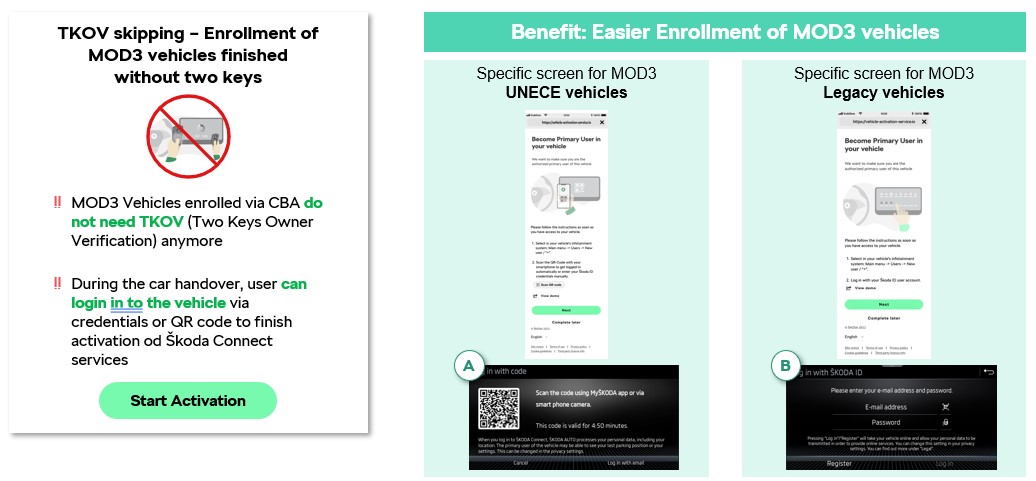
For MOD3 vehicles, the method for logging in can vary depending on the version of the infotainment system that vehicle is equipped with:
For vehicles that comply with the United Nations Economic Commission for Europe (UNECE) regulations, customers can conveniently log in using a QR code. This approach involves scanning the QR code displayed on the infotainment screen with a mobile device, which then facilitates a seamless login process.
On the other hand, for legacy vehicles with older versions of infotainment systems, customers are required to use traditional credentials to log in. This means entering an email and password manually on the infotainment interface.
Two-key owner verification skipping:
TKOV skipping is only possible when enrolment is done with the help of CBA. To enable this method you should follow these steps:
A) Customer (B2C customer) arrives at the dealership and orders a new Production, Stock, Used or In use car.
B) Dealer enters all relevant data (personal information, commission number or VIN etc.) in Connect Boarding Application (CBA)
Note: It is required to enter Commission number or VIN to ensure correct process and subsequent TKOV skipping
C) During the car handover, the users can log in to their vehicle using their credentials or QR code to complete the activation of Škoda Connect services.
Note: The CBA process is terminated when the dealer logs in to vehicle before handover– instead a regular self-enrolment process is initiated and TKOV cannot be skipped.
Once the vehicle is enrolled, Škoda Connect services are activated, the Preferred Service Partner is set, and Service Scheduling is activated automatically (if requested in advance by the customer) – in this way, Remote Access will also be available for MOD4 vehicles. To view the Preferred Service Partner and Service Scheduling, the customer must log back into the app or refresh their garage using the “Refresh the page” button. The Registration Process is now successfully completed.

Once the vehicle is enrolled, Škoda Connect services are activated, the Preferred Service Partner is set, and Service Scheduling is activated automatically (if requested in advance by the customer) – in this way, Remote Access will also be available for MOD4 vehicles. To view the Preferred Service Partner and Service Scheduling, the customer must log back into the app or refresh their garage using the “Refresh the page” button.
The Registration Process is now successfully completed.